Ingredient Spotlight: Exploring the Versatility of Chocolate

When it comes to baking and desserts, few ingredients are as universally beloved as chocolate!

Photos By: Unsplash

Whether in the form of rich, creamy ganache or gooey, fudgy brownies, chocolate has the power to elevate any dish to new heights of deliciousness. But chocolate isn’t just a one-trick pony – this versatile ingredient can be used in a wide variety of ways, from subtle accents to bold, in-your-face flavors.

In this guide, we’ll take a closer look at the many faces of chocolate, from the deep, complex flavors of dark chocolate to the creamy sweetness of milk chocolate. We’ll explore the unique properties of this ingredient and how they can be used to create stunning desserts that will impress even the most discerning of palates. Whether you’re a seasoned baker or just starting out, this guide is sure to inspire you to get creative with chocolate in your own kitchen. So grab a bar (or two, or three) of your favorite chocolate and let’s get started!

The Science of Chocolate

Chocolate is not just a tasty treat; it is also a complex ingredient that requires a bit of understanding to get the best results in your baking. At its most basic level, chocolate is made from cocoa beans, which are harvested and then roasted to create cocoa solids and cocoa butter. These two elements are then mixed with sugar, milk, and other ingredients to create the chocolate products we know and love.

Understanding the properties of chocolate is essential to using it properly in your baking. Chocolate contains compounds such as flavonoids, which are known for their antioxidant properties. These compounds also contribute to the flavor and color of the chocolate. The amount of cocoa solids in chocolate can vary, and this affects the intensity of the chocolate flavor.

There are three main types of chocolate: dark, milk, and white. Dark chocolate has a high percentage of cocoa solids and a bitter taste. Milk chocolate has less cocoa solids and is sweeter than dark chocolate. White chocolate contains no cocoa solids but is made from cocoa butter, sugar, and milk solids.

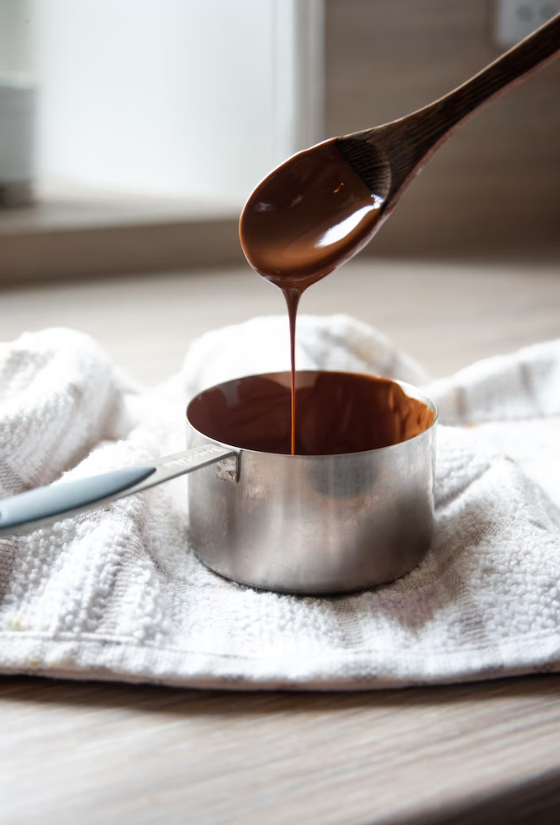
Tempering chocolate is the process of melting and cooling it in a specific way to create a smooth, shiny finish and a crisp snap when it is broken. Properly tempered chocolate also has a more stable structure, making it ideal for use in molded chocolates, truffles, and other confections. Tempering can be tricky, but with practice and patience, anyone can learn to do it successfully.

Sweet Treats

Chocolate is an incredibly versatile ingredient that can be used to create a wide range of sweet treats that everyone can enjoy. Whether you are a chocoholic or simply love to indulge in the occasional chocolate dessert, the possibilities are endless.

One classic recipe that is always a crowd-pleaser is a classic chocolate cake. Rich, moist, and decadent, this cake is the perfect canvas for any frosting or filling that you desire.

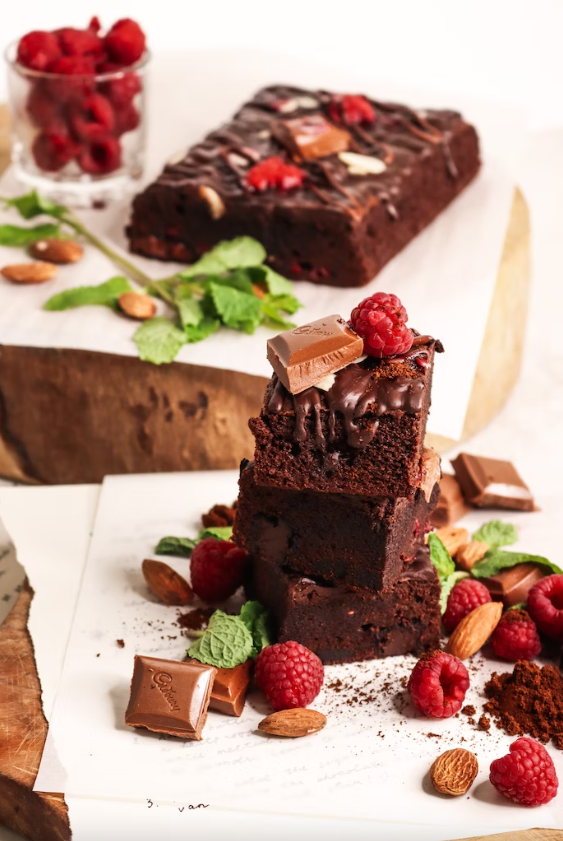
If you prefer something a bit simpler but still crave the chocolate flavor, then chocolate chip cookies might be just what you need. These cookies are perfect for a snack, a quick dessert, or even as a gift to share with friends and family. And for those who can’t resist the gooey, fudgy goodness of brownies, we’ve got you covered.

Our fudgy brownies recipe is the perfect combination of cakey and fudgy, with a rich chocolate flavor that is sure to satisfy your sweet tooth. But don’t let these recipes limit you, chocolate can also be used in any kind of dessert you can think of, from ice cream to arroz con leche. Find that recipe here: mahatmarice.com/recipes/arroz-con-leche/.

Unexpected Uses

While chocolate is primarily known for its use in desserts, it can also be used in unexpected and unconventional ways. For instance, did you know that chocolate can be used to create beauty products? Chocolate contains antioxidants and anti-inflammatory properties that can soothe and nourish the skin. You can create a luxurious chocolate face mask or a chocolate body scrub that will leave your skin feeling soft and rejuvenated.

Another unexpected use of chocolate is in cocktails. Chocolate-based cocktails have become increasingly popular in recent years, with mixologists experimenting with unique flavor combinations. From a classic chocolate martini to a chocolate old fashioned, there are endless possibilities when it comes to incorporating chocolate into your drinks.

And finally, chocolate can even be used in savory snack recipes. Cocoa powder can add depth and richness to chili or mole sauce, while a sprinkle of cocoa nibs can add crunch and texture to roasted vegetables or salads. One unexpected recipe that’s worth trying is chocolate arroz con leche, a traditional Mexican rice pudding with the addition of chocolate. It’s the perfect balance of sweet and indulgent, and a unique way to enjoy chocolate in a non-dessert form.

Savory Dishes

Chocolate’s rich, complex flavor can also add a unique depth to savory dishes. In this section, we will explore some surprising ways to use chocolate in your cooking.

First up is a classic Mexican sauce that features chocolate as one of its main ingredients. Mole sauce is a complex blend of spices, chiles, and chocolate that is traditionally served over chicken or turkey. Our mole recipe uses a combination of ancho and guajillo chiles, toasted nuts, and rich chocolate to create a sauce that is deep, earthy, and a little bit sweet.

Next, we have a hearty chili recipe that uses chocolate to balance out the heat of the spices. Our recipe combines ground beef, kidney beans, and a blend of chili powders with dark chocolate to create a rich, meaty stew that is perfect for a chilly evening.

Finally, we have a recipe for a chocolate balsamic glaze that is perfect for drizzling over grilled meats, roasted vegetables, or even fresh fruit. This sweet and tangy sauce is made by reducing balsamic vinegar with brown sugar and cocoa powder until it becomes thick and syrupy.

By incorporating chocolate into your savory dishes, you can add a unique flavor profile that will surprise and delight your taste buds. So next time you’re in the kitchen, don’t be afraid to experiment with this versatile ingredient in new and unexpected ways.

Cupcake Craze: The Best Cupcake Recipes and Decorating Ideas

Cupcakes have taken the world by storm with their adorable size, portability, and versatility!


Photos By: Stock Images

They can be customized to fit any occasion, from birthdays to weddings, and come in a variety of flavors and designs. Whether you’re a beginner baker or an experienced pastry chef, mastering the art of cupcake baking and decorating is a must.

In this article, we will explore some of the best cupcake recipes and decorating ideas that will take your cupcake game to the next level. From classic vanilla cupcakes to decadent chocolate ones, we’ve got you covered. We’ll also provide tips and tricks for making the perfect cupcake, including how to achieve the ideal texture and moisture.

But it’s not just about the taste- the appearance of your cupcakes is just as important. That’s why we’ve also included creative decorating ideas that will impress your guests and make your cupcakes stand out. Whether you prefer a simple buttercream frosting or a more intricate design, we’ll provide step-by-step instructions to make your cupcakes look as good as they taste.

So, grab your mixing bowls and piping bags, and let’s get started on this cupcake craze!

Essential Cupcake Tips

Cupcakes are one of the most beloved treats around the world, but getting them just right can be tricky. Fortunately, there are a few key tips that can help ensure your cupcakes turn out perfectly every time.

  • One of the most important things to keep in mind when making cupcakes is to use room temperature ingredients. This means that your eggs, butter, and milk should all be at room temperature before you start baking. This allows the ingredients to mix together more easily, resulting in a smoother batter and a better rise.
  • Another important tip is to measure your ingredients properly. This is especially important for baking, as even small deviations from the recipe can result in a significant change in the final product. Use a kitchen scale to weigh your ingredients whenever possible, as this is the most accurate way to measure.
  • When mixing your batter, it’s important not to overmix. Overmixing can lead to tough, dense cupcakes. Mix just until the ingredients are combined and no streaks of flour remain.
  • Baking cupcakes at the right temperature and for the right amount of time is also crucial. Be sure to preheat your oven to the temperature specified in the recipe, and use an oven thermometer to ensure that your oven is heating accurately. As a general rule, cupcakes should be baked for 18-20 minutes, but this can vary depending on the recipe and the size of the cupcakes.
  • To test for doneness, insert a toothpick or cake tester into the center of the cupcake. If it comes out clean, the cupcakes are done. If there is still batter clinging to the toothpick, return the cupcakes to the oven and check them again in a few minutes.

Classic Cupcake Recipes

This classic sweet treat is loved by people of all ages. Here are some classic cupcake recipes that everyone will enjoy:

  1. Vanilla Cupcakes: A classic vanilla cupcake is always a hit. This recipe is moist and fluffy with a delicate vanilla flavor. It can be topped with your favorite frosting or left plain for a simple treat.
  2. Chocolate Cupcakes: Rich, decadent, and oh-so-chocolatey, these cupcakes are a chocolate lover’s dream. Topped with chocolate buttercream or ganache, they are perfect for any occasion.
  3. Red Velvet Cupcakes: These beautiful cupcakes have a rich, chocolatey flavor and a striking red color. They are traditionally topped with cream cheese frosting and are perfect for Valentine’s Day or any special occasion.
  4. Lemon Cupcakes: These bright and tangy cupcakes are perfect for a summer party or picnic. The light and fluffy texture of the cake pairs perfectly with the zesty lemon frosting.
  5. Carrot Cupcakes: A delicious twist on the classic carrot cake, these cupcakes are loaded with shredded carrots, pecans, and warm spices. They are topped with a creamy cream cheese frosting and are perfect for fall.

For each recipe, we’ll provide step-by-step instructions on how to make the perfect cupcake. We’ll also offer tips on how to make the recipe your own and suggestions for creative frosting and decoration ideas. Get ready to impress your friends and family with these classic cupcake recipes!

Unique and Creative Cupcake Recipes

The lavender honey cupcakes are a perfect balance of flavors with a light, fluffy texture. The sweetness of honey combined with the delicate floral notes of lavender will make you feel like you’re walking through a garden. Top them off with a dollop of whipped cream and a sprinkle of lavender buds for an elegant touch.

If you’re looking for something with a little more of a kick, try the matcha green tea cupcakes. Matcha powder, made from ground green tea leaves, has a distinct earthy flavor that pairs perfectly with the sweetness of the cupcake. Add a dollop of matcha-infused frosting and sprinkle some matcha powder on top for a unique and eye-catching dessert.

These creative cupcakes are not only delicious but also fun to decorate. Try using fresh flowers, colorful sprinkles, or even edible glitter to give your cupcakes that extra pop of color and sparkle. Don’t be afraid to experiment with different frostings, toppings, and decorations to make your cupcakes truly your own.

Decorating Tips and Ideas

One of the best things about cupcakes is that they offer endless decorating possibilities. Whether you prefer a classic and elegant look or a playful and whimsical vibe, there are so many ways to make your cupcakes look stunning. Here are some decorating tips and ideas to inspire you:

  • Piping techniques: Piping frosting onto cupcakes is a great way to create beautiful designs and add texture. Experiment with different piping tips to achieve different looks, such as a classic swirl, rosettes, stars, or even animal shapes.
  • Creative frosting flavors: While vanilla and chocolate frosting are classics, why not mix it up with some unique flavors? Try making frosting with flavors such as peanut butter, lemon, lavender, or even matcha green tea.
  • Edible decorations: Adding edible decorations to your cupcakes can take them to the next level. Use sprinkles, edible glitter, fresh fruit, or even edible flowers to add color, texture, and flavor.
  • Themed cupcakes: Whether it’s for a special occasion or just for fun, themed cupcakes are always a hit. Try making cupcakes with a specific theme in mind, such as holidays, sports, or favorite TV shows or movies.
  • DIY toppers: Creating your own cupcake toppers is a fun and easy way to add a personal touch to your cupcakes. Use toothpicks and paper cutouts to create shapes such as hearts, stars, or even your initials.

By incorporating these decorating tips and ideas into your cupcakes, you can create delicious treats that not only taste amazing but also look incredible.

If you liked these tips and recipes, but prefer us to share recipes and tricks for savory dishes, don’t worry, we’ve also got you covered. Try this recipe for a main course: carolinarice.com/recipes/arroz-chaufa/, and the baking tips we’ve just provided for the perfect dessert! And of course, don’t forget to comment on which was your favorite tip!

Gluten-Free Baking: Delicious Recipes for Allergy-Friendly Treats

Gluten-free baking has become increasingly popular over the years as more people discover that they have celiac disease or gluten intolerance!


Photos By: Stock Images

Gluten is a protein found in wheat, barley, and rye that can cause a range of health issues for those who are sensitive to it. Some common symptoms of gluten intolerance include bloating, abdominal pain, diarrhea, and fatigue. For people with celiac disease, consuming gluten can damage the small intestine and lead to malabsorption of important nutrients.

Fortunately, there are plenty of delicious and satisfying gluten-free baking options available for those who need to avoid gluten. From savory breads and muffins to sweet cakes and cookies, gluten-free baking has come a long way in recent years. Whether you are new to gluten-free baking or a seasoned pro, there are plenty of creative and tasty recipes out there that can satisfy your sweet tooth or craving for something savory.

In this article, we will explore some of the basics of gluten-free baking and share some delicious and easy-to-follow recipes that you can try at home. Whether you are gluten-free by choice or necessity, we hope to inspire you to get creative in the kitchen and enjoy the many benefits of gluten-free baking.

Common Gluten-Free Flours and Their Uses

Gluten-free baking can be a bit challenging as gluten is a key component in traditional baking. However, there are many alternative flours that can be used to achieve similar results. These flours are made from grains, nuts, and seeds that are naturally gluten-free, making them a perfect substitute for wheat flour.

Here are some common gluten-free flours and their uses:

  • Almond Flour: Almond flour is made from ground almonds, which gives baked goods a nutty and slightly sweet flavor. It is perfect for making cookies, cakes, and bread, and can also be used as a gluten-free alternative to breadcrumbs.
  • Coconut Flour: Coconut flour is made from ground coconut meat, which is low in carbohydrates and high in fiber. It is perfect for making gluten-free pancakes, waffles, and muffins.
  • Rice Flour: Rice flour is made from ground rice, and it comes in both white and brown varieties. It has a neutral flavor and is perfect for making gluten-free cakes, cookies, and bread.
  • Oat Flour: Oat flour is made from ground oats, and it has a slightly sweet and nutty flavor. It is perfect for making gluten-free pancakes, muffins, and bread.

When substituting gluten-free flours for wheat flour, it is important to keep in mind that gluten-free flours absorb more liquid than wheat flour. This means you may need to adjust the amount of liquid in your recipe to achieve the desired consistency. It is also important to note that gluten-free flours do not have the same binding properties as wheat flour, so you may need to add a binding agent, such as xanthan gum or guar gum, to your recipe.

With a little experimentation and creativity, gluten-free flours can be used to create delicious and allergy-friendly treats that everyone can enjoy!

Gluten-Free Baking Tips and Tricks

Baking without gluten can be a challenge, but with the right tips and tricks, you can create delicious and satisfying treats that everyone can enjoy. Here are some practical tips for successful gluten-free baking:

  • Combine different flours: Gluten-free flours tend to have different textures and flavors than wheat flour, so combining them can help achieve a better overall result. For example, mixing almond flour with coconut flour can give a baked good a softer texture, while adding oat flour can increase its nutritional value.
  • Use xanthan gum or other binders: Xanthan gum is a common binder used in gluten-free baking. It helps to replace the binding properties of gluten, which helps create a better texture and crumb in baked goods. Other binders that can be used include guar gum and psyllium husk.
  • Increase leavening agents: Gluten-free flours tend to be denser than wheat flour, so it’s important to increase the amount of leavening agents used in recipes. This can include baking powder, baking soda, and yeast. Be careful not to overdo it, as too much leavening can cause baked goods to collapse or become too spongy.
  • Don’t overmix: Gluten-free batters and doughs can be delicate, so it’s important not to overmix them. This can cause the baked good to become tough and chewy. Mix the ingredients just until they are combined, and then stop.
  • Add moisture: Gluten-free flours tend to absorb more moisture than wheat flour, so it’s important to add additional moisture to recipes. This can include adding extra liquid, such as milk or water, or adding ingredients like applesauce or yogurt to help keep baked goods moist.

By following these tips and tricks, you can create delicious and satisfying gluten-free treats that everyone will love.

Delicious Gluten-Free Baking Recipes

Here are three delicious gluten-free baking recipes that you can enjoy:

  • Blueberry Almond Flour Muffins: These tender, fluffy muffins are made with almond flour, making them both gluten-free and protein-packed. Loaded with juicy blueberries, they are perfect for a quick breakfast or snack on-the-go.
  • Chewy Chocolate Chip Cookies: Who doesn’t love a classic chocolate chip cookie? This recipe uses a combination of almond flour and coconut flour to create a chewy, flavorful cookie that is sure to satisfy your sweet tooth.
  • No-Knead Artisan Bread: This easy-to-make bread is perfect for those who love fresh-baked bread but don’t want to spend hours kneading and rising dough. Made with a blend of gluten-free flours, it has a crusty exterior and a soft, chewy interior that is perfect for dipping into soups or spreads.

Each recipe is designed to be both delicious and easy to make, so you can enjoy gluten-free baked goods whenever you want!  If you’re looking for a gluten-free savory baked dish to try, here’s a recipe for you: https://successrice.com/recipes/vegan-brown-rice-bbq-meatloaf/.

As we have seen, gluten-free baking is a great way to provide allergy-friendly treats for those with gluten sensitivities or celiac disease. By using alternative flours and experimenting with different ingredients, it is possible to create delicious baked goods that everyone can enjoy.

Don’t be afraid to try new recipes and techniques, and don’t hesitate to share your favorite recipes and tips with others. With a little creativity and a lot of passion, gluten-free baking can be just as satisfying and delicious as traditional baking.

Bread Basics: How to Make Perfect Loaves Every Time

There’s nothing quite like the aroma of fresh-baked bread filling your home. Whether you’re a seasoned pro or a beginner, mastering the art of bread making is an essential skill. In this guide, we will cover the basics of bread making and provide you with tips and tricks for perfect loaves every time!


Photos By: Unsplash

From selecting the right ingredients to kneading and shaping the dough, you’ll learn everything you need to know to make delicious bread at home. So, roll up your sleeves and let’s get baking!

Ingredients

The key to baking perfect bread is having the right ingredients. Here’s a breakdown of the essential ingredients you’ll need:

  • Flour: The type of flour you use will affect the texture and flavor of your bread. All-purpose flour is a good choice for beginners, but you can experiment with bread flour, whole wheat flour, and other types of flour to achieve different results.
  • Yeast: Yeast is what makes your bread rise. You can use active dry yeast, instant yeast, or fresh yeast. Follow the instructions on the package to activate the yeast properly.
  • Salt: Salt is important for flavor, but it also helps control the fermentation process and strengthens the gluten structure in the bread.
  • Sugar: Sugar adds sweetness and helps feed the yeast. You can use granulated sugar, honey, molasses, or other sweeteners.
  • Water: Water is the main liquid in your dough. It should be warm (around 110°F) to activate the yeast but not too hot to kill it.

Other optional ingredients you may want to include in your bread recipe are milk, eggs, butter, and herbs or spices.

Techniques

Making bread is not just about mixing the ingredients and putting them in the oven. There are specific techniques that need to be followed to get the perfect loaf. Here are some essential techniques you need to know:

  1. Mixing: One of the most important steps in bread making is mixing. It’s essential to mix the ingredients properly to achieve the right consistency. Mixing can be done by hand or with a mixer, but it’s important not to over-mix as this can make the bread tough.
  2. Kneading: Kneading is an important step in developing gluten in the dough, which gives the bread its structure and texture. Kneading also helps to distribute the yeast evenly throughout the dough. It’s important to knead the dough until it’s smooth and elastic, which usually takes about 10-15 minutes.
  3. Rising: The rising process is crucial to the success of your bread. The dough needs to be placed in a warm, draft-free place for the yeast to work its magic. The ideal temperature for rising is between 80-85°F. You can cover the dough with a damp towel or plastic wrap to prevent it from drying out.
  4. Shaping: Shaping the dough is where the art of bread making comes in. There are many different ways to shape bread, depending on the type of bread you are making. It’s important to handle the dough gently to avoid deflating it.
  5. Scoring: Scoring is the process of making shallow cuts in the surface of the dough before baking. This helps to release the steam from the bread as it bakes, which results in a crispy crust. It also allows the bread to expand evenly in the oven. Use a sharp knife or a bread lame to score the dough.

By mastering these essential techniques, you can make perfect loaves of bread every time.

Baking

Baking bread is not just about mixing and kneading the dough, it’s also about the baking process itself. After you have shaped your dough, it’s time to put it in the oven. But before that, you need to make sure your oven is preheated to the correct temperature. This is important because the right temperature will help your bread bake evenly and rise properly.

When it comes to baking times and temperatures, there are many variables to consider. These include the size and shape of your loaf, the type of flour you used, and the moisture content of your dough. Generally, most breads bake at 375-425°F (190-220°C) for 30-40 minutes, but it’s always best to refer to your specific recipe for guidance.

To test if your bread is perfectly baked, you can tap the bottom of the loaf. If it sounds hollow, it’s ready! Another way to check is to insert an instant-read thermometer into the center of the loaf. If it reads between 190-210°F (88-99°C), your bread is fully cooked.

Once your bread is out of the oven, it’s important to let it cool properly before slicing into it. This allows the crumb structure to set, giving your bread a chewy texture and preventing it from becoming too gummy. The cooling process can take anywhere from 1-2 hours, depending on the size and shape of your loaf. You can cool your bread on a wire rack or a clean towel.

Troubleshooting

Bread making can be a finicky process, and even experienced bakers can run into issues from time to time. But don’t fret – with a little knowledge and practice, you can troubleshoot most common problems and end up with a perfect loaf every time.

One of the most common problems in bread making is over-rising. This can cause the dough to become too light and airy, resulting in a flat or misshapen loaf. To avoid over-rising, be sure to pay attention to the timing and temperature of your rising environment. If your dough has risen more than it should have, you can punch it down and reshape it before letting it rise again.

Under-rising can also be a problem, resulting in a dense and heavy loaf. To ensure your dough rises properly, make sure your yeast is fresh and active, and that your rising environment is warm and draft-free. If you’re still having trouble with under-rising, try adding a little extra yeast or letting your dough rise for a bit longer.

Tough crusts are another issue that can plague bakers. To get a softer crust, try brushing your loaf with melted butter or oil before baking, or baking it covered for the first part of the baking process.

Sticky or misshapen loaves can also be a problem. If your dough is too sticky, try adding a little extra flour. If your loaf is misshapen, make sure you’re shaping it properly and that it’s not sticking to your work surface.

With a little practice and patience, you’ll be able to troubleshoot most bread making problems and achieve perfectly baked loaves every time.

Try all these tips to bake the perfect bread to have with your favorite dish. If this guide wasn’t enough, we’ve also got your dish covered, check a recipe here: https://minuterice.com/recipes/rice-stuffed-eggplant-parmesan/. Enjoy and let us know how it goes!

European Gastronomy: Discover the Delicious Italian Cuisine

On a trip to Italy you can prioritize visiting its monuments, living the Roman Empire history in first person or touring its postcard landscapes. But this country, of course, also stands out for its gastronomy, expanded to any point on Earth!

Photos By: Unsplash

Pasta and pizza are the most famous dishes. However, Italian gastronomy is characterized by its elaborations with abundant vegetables, fruits, meats, fish, rice, pasta and breads. Other typical dishes, besides pizza and pasta, are risotto, lasagna and carpaccio.

Among the traditional desserts are its famous gelato, better known as ice cream, tiramisu and babà of Naples. Finally, among the typical Italian drinks are lemoncello, grappa and sambuca. Here are some of its typical dishes:

Risotto

This typical Italian food is prepared with rice and Parmesan cheese, however, nowadays there are many risotto recipes with different ingredients. Originally from the northwest of Italy, and due to the abundance of rice, this dish is already famous practically all over the world. And a well-made risotto is when you can appreciate its typical creaminess. To achieve that creaminess, arborio rice is the best option to make risotto. In this link: https://riceselect.com/product/arborio you can get all the information about arborio rice to get the perfect dish.

Pizza

The origin of pizza has a lot to do with bread in Italy, since in ancient Rome it was customary to make bread in a circular shape and cut into portions. Years later, other ingredients such as tomato sauce and mozzarella cheese were added to this flour dough, but nowadays pizza can be made with a wide variety of ingredients such as fruits, vegetables, even meat or chicken, fish, seafood and sausages.

Carpaccio

Carpaccio is now an internationally famous recipe. What is so special about this dish? Well, it is made with raw meat. And since Mediterranean trends in cuisine over the last decades, it has become pretty fashionable to eat raw meat. Now, the magic to make this dish delicious is to cut the meat very thinly and to accompany it with ingredients such as cheese, onion, basil and olive oil.

Lasagna

Although the preparation of lasagna varies according to the region where it is prepared, it consists of a type of pasta in the shape of a square sheet that is placed in the form of a block and filled with meat, fish or vegetables. Between each sheet it also has béchamel sauce, and to finish it off, abundant cheese to give it its usual gratin look. If you have not yet decided to make it, go ahead and try it, it is one of those dishes that are not to be missed and starting with the homemade meat lasagna will be ideal.

Caprese salad

Since Italy is not all about flour, you should try their classic caprese salad with such basic ingredients as tomato, fresh mozzarella, a few basil leaves and a drizzle of olive oil. As simple as it may seem, the combination of these ingredients results in a salad that stands out for its fresh taste and its colors that remind us of the Italian flag. Also, it came as a special taste in the typical Argentinian empanadas. The caprese empanada is becoming more and more popular.

Arancini

Typical dish of Sicilian gastronomy, although its ingredients are typical of any Mediterranean country cuisine. They are round croquettes of rice pasta that have an orange color due to the use of saffron, are served hot and are taken as any dish of the day. The arancini are a typical dish of the city of Messina, where it was probably invented.

Pasta carbonara

One of the typical Italian dishes is pasta alla carbonara. This Italian food is a pasta dish originating from Lazio, and more specifically from Rome. The original recipe is based on eggs, cheese (Pecorino Romano or Parmesan), extra virgin olive oil, pancetta or guanciale and black pepper. Spaghetti is the pasta generally used; however, fettuccine, rigatoni or bucatini can also be used. Many people say the word carbonara comes from carbone, which in Italian is the name for charcoal (carbonari), and it is believed that the name of the dish has its origin in the typical dish of the charcoal makers in the Apennines. Others mention

that the name charcoal is due to the use of black pepper in the preparation of the sauce, which may be reminiscent of charcoal.

Peruvian Gastronomy

Peruvian gastronomy is the ideal excuse to tour Peru and get to know the dishes that characterize each of its places and regions!

Photos By: Unsplash

Its culinary history dates back to the Inca culture with its variety of potatoes, corn and spices. Later, the Spaniards introduced products such as grapes, olives, chicken, meats and dairy products and, finally, in the 19th century, with immigration came Asian and Italian influences: Peruvian cuisine has all these nuances and is recognized for the delicate balance of the fusion between them.

Every place where you can taste Peruvian gastronomy offers exquisite dishes, whether it is the best restaurant or a small street stall. In short, this cuisine combines the experience of traditional and migrant ingredients, the contributions of modern gastronomy and current and ancient cooking techniques.

Undoubtedly, Peruvian cuisine is one of the most acclaimed in the world thanks to the creative quality of its chefs, the generosity of a territory rich in first-class raw materials, a culinary history open to renewal and the sum of different cultures.

In Peru, the most famous dishes are:

● Chaufa rice in the first place. If you are wondering how this dish tastes,
follow the recipe here: carolinarice.com/recipes/arroz-chaufa/
● Wantán soup.
● Chi jau cuy.
● Alpaca roll.

1. Features of Peruvian gastronomy that make it famous

Fusion food

Foreign recipes in which original ingredients are substituted by autochthonous ingredients or the other way around, Peruvian recipes to which some ingredients are added or changed by traditional products from other cultures.

Some examples of Peruvian dishes that are the result of fusion:

● Nikkei, a sophisticated combination: Japanese immigrants were called Nikkei in Peru and Japanese-Peruvian fusion cuisine kept that name. With elegant and exquisite recipes, this style combines -in a sublime balance-ingredients from Japanese cuisine, such as rice and fish, with typical Peruvian products, such as chili peppers and grains.

● Peruvian cuisine with a Mediterranean accent: Italian immigration brought to Peru the characteristic ingredients of Mediterranean recipes: vegetables, pizzas and pastas.

2. Traditional ingredients and ancestral customs

Peru has a great variety of dishes by region. Whether you go to the coast, the jungle or the mountains, you will always be delighted with its delicious recipes! Among its ingredients, Peruvian gastronomy has fresh raw materials of excellent quality and great variety: fish, seafood, fruits, vegetables, potatoes, peppers, corn, spices, avocados, quinoa, aguaymanto and much more, which offer high nutritional value and special flavors.

It is worth mentioning that the return to the past, especially to Andean cuisine, is a
trend. Another element that is a hallmark of some preparations is pisco, the country’s
cultural heritage drink.

Peruvian food has centuries of history and development and forms a fundamental part of the Inca heritage, but at the same time was enriched by Spanish, African, French and Chinese-Cantonese culture.

3. Characteristic dishes in each region

Just like Mexican and other ancient and varied gastronomic cultures, Peruvian cuisine has characteristic dishes for each region. Every time you visit a new city when traveling to Peru, you will see new recipes, variations of famous dishes and in general a unique seal, which will delight you and will remain engraved in your memory. Let’s see, then, what Peruvian food is like in each region.

The highlands: powerful and nutritious dishes

It covers the area of the Andes Mountains and crosses the country from north to south. Here, visitors find an excellent gastronomy with flavors and colors that make each presentation unique.

One of the most representative dishes of the region is the pachamanca, made with a variety of meats, such as chicken, pork, beef, sheep and guinea pig, seasoned with aromatic herbs and cooked in earth ovens.

The coast: fresh and simple recipes

The Peruvian coastline – bathed by the Pacific Ocean – is the source of an infinite
number of flavors, as well as beautiful beaches. Although each coastal city has its own gastronomy, fish, aji amarillo, aji rojo, seafood, potatoes and rice are present in most of its recipes. Undoubtedly, the most popular dish is ceviche, a delicacy of Peruvian gastronomy with a simple preparation: basically, it consists of pieces of fresh fish that are left to marinate in a container with lemon juice for approximately 20 minutes, to which red onion, coriander or cilantro, chili bell pepper and salt are added to give it intense aromas and flavors.

The jungle: foods with special flavors

Amazonian gastronomy has a distinctive characteristic: sophisticated and exuberant
flavors that mix unique ingredients such as tropical fruits and river fish like paiche.

All You Need to Know About Thai Gastronomy

Thai cuisine is a harmonious blend of Southeast Asian traditions and flavors characterized by strongly flavored dishes in which not only the spiciness stands out, but also in each dish a balance is sought between the fundamental senses of taste with sweet, salty, sour and sometimes bitter nuances that make Thai cuisine one of the richest and Thailand a paradise for those who love good food!

Photo By: Stock Images

Thai cuisine is one of the main attractions of the country and an important part of its culture.

Here are some of the most famous recipes that have made Thai cuisine known all over the world and that you cannot miss.

Khao Pad  

Rice is one of the basic ingredients that can never be missing. In Thailand, the jasmine variety is used. In fact, “eat” in Thai is Kin Khao which literally means to eat rice.

An ideal dish for beginners is Khao Pad, Thai-style fried rice. There are an infinite number of versions prepared with different types of meat or seafood and vegetables, the most widespread is fried rice with chicken, Khao Pad Kai a simple and delicious dish that is always liked.

If you follow this link mahatmarice.com/products/jasmine-white-rice/ you will find all the information about jasmine rice: nutrition facts, dietary considerations and how it is prepared.

Pad Thai  

Pad Thai is one of the most well-known dishes of Thai cuisine and indispensable for both locals and foreigners that can be enjoyed anywhere in the country and that you can’t miss during your trip.

There are many versions and recipes of Pad Thai for all tastes depending on the area of Thailand where it is prepared, combining sweet, sour and salty nuances with a surprising texture and flavor.

It is a stir-fry of noodles or rice noodles that are fried with egg, seasoned with palm sugar, tamarind paste and fish sauce, accompanied by tofu and some vegetables such as chives and to complete its flavor prawns, shrimp, chicken or pork. It is served with some lime slices, fresh bean sprouts, dried chili powder and crushed roasted peanuts to taste.

Tom Yum  

Thailand’s most famous soup, Tom Yum with its blend of aromas and flavors, will not leave you indifferent. It is usually made with prawns (Kung), flavored with coriander and ginger, citrus nuances of lemongrass and lime, a sweet point with palm sugar and not forgetting the spicy chili that characterizes Thai cuisine.

There are also versions with different ingredients such as chicken, fish or squid and made with and without coconut milk. It is a real pleasure for the senses!

Poh Piah  

Thai-style spring rolls are one of the most popular appetizers. It is a dish with influences from Vietnamese cuisine but very typical in Thai cuisine. The spring rolls recipes are very common throughout Asia, but each country has its different versions and in Thailand they are prepared in a very characteristic way.

Thai rolls can be filled with different ingredients. The most common are soy noodles, bean sprouts, vegetables and chicken but can be made with pork, shrimp or tofu. Once these ingredients are fried, they get a crunchy texture on the outside that contrasts with the soft and delicious inside filling. This is a dish that is not spicy and is accompanied by different sauces such as sweet and sour, chilli sauce, sweet or peanut sauce.

Mango Sticky Rice  

It is the traditional dessert par excellence in Thailand and is usually liked by everyone. The main ingredients are ripe mango, peeled and sliced, accompanied by white glutinous or sticky rice, better known as sticky rice, bathed in coconut milk and sugar. g

It is advisable to learn some basic Thai words and phrases that will be very useful, pork (Muu), chicken (Kai), beef (Nua), prawns (Kung), seafood (Ta-lee) and remember to indicate the level of spiciness, in Thai is Pet, if you do not want spicy Mai Pet, little Pet Noi and a lot of Pet Mak.

Thailand has an infinity of street food stalls where you can enjoy authentic street food and restaurants with a great value for money to enjoy one of the best cuisines in the world.