Granny’s Mini Pecan Pie Tarts

healthy grannys mini pecan pie tarts recipe easy better baking bible blog nuts walnuts muffin cups cupcake fall recipe snack butter easyPECAN PIE CLOSE-UP / SEA TURTLE / CC BY , IMG_5886 / ISABELLE / CC BY

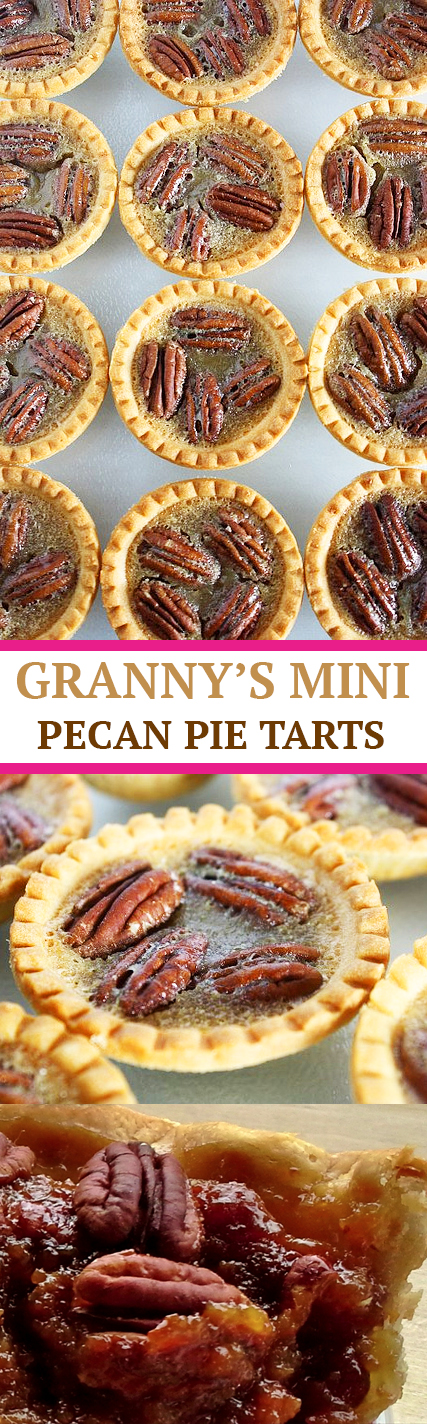
Calling all nut lovers – satisfy your sweet tooth this season with you very own homemade pecan pie tarts! You shouldn’t have to settle for only a slice of pecan pie when you can have your very own mini-pecan tarts overloaded with healthy nuts and a gooey mixture of brown sugar, butter, eggs and vanilla. These pecan pie tarts are hands down my favorite dessert and make the perfect treat to toss in a zip-lock bag and take with you on the go. You can even make this recipe in advance and display the tarts on tiered cupcake holders for an elegant presentation and a warm welcome to the upcoming season. If you are looking for a Thanksgiving dessert or a mini gift for x-mas, I would definitely have these tarts at the top of my list. 

Granny’s Mini Pecan Pie Tarts

Yields 12
These mini pecan tarts are easy to make desserts and make great snacks to take to school or to the office!
 
 
Ingredients:
 
For Pie Tarts
 
  1. 2 (3-ounce) packages cream cheese, softened
  2. 2/3 cup unsalted butter, softened
  3. 2 cups all-purpose flour
  4. 1/2 teaspoon salt
  5. 1 cup chopped pecans
For Filling
 
  1. 3 large eggs, beaten
  2. 1 cup firmly packed dark brown sugar
  3. 3/4 cup light corn syrup
  4. 2 tbsp butter, melted
  5. 1 teaspoon vanilla extract

Instructions:

To Make Pie Tarts
 
  1. In a medium bowl, beat together cream cheese and 2/3 cup butter at medium speed. Beat in flour and salt until combined and divide the dough in half. Flatten each half into a circle about 1 inch thick, wrap in plastic wrap and let it chill for 1 hour.
  2. Shape dough into 2-inch balls and flatten them. Place each into in 3-inch muffin cups, forming each into a shell and letting it form a lip above the cups. You can use a fork to press into the edges to make little decorative lines. Sprinkle pecans evenly in pastry cups.
To Make Filling
 
  1. Whisk together eggs, brown sugar, corn syrup, butter, vanilla extract and salt until blended.
  2. Pour mixture evenly over pecans until pastries are full. Bake at 350F for 30-35 minutes or until set.

Hummingbird Cake Recipe with Cream Cheese Frosting

cream-cheese-hummingbird-cake-walnuts-filling-layers-recipe-spring-summer-easy-better-baking-bible-blog-pecans-1

A lovely way to start of the spring and summer season with a multi-layered hummingbird cake filled with cream cheese frosting! Moist pineapple, crunchy pecans or walnuts and loads of flavor!

*If you would like to share my recipe and photos please provide proper credit and a link back. Thanks!

Hummingbird Cake Recipe with Cream Cheese Frosting

 
Ingredients:
 
  1. 3 cups flour
  2. 1 cup sugar
  3. 1 tsp table salt
  4. 1 tsp cinnamon
  5. 1 tsp baking powder
  6. 1 tsp baking soda
  7. ¼ tsp allspice
  8. 1 1/3 cups vegetable oil
  9. 2 tsp vanilla extract or vanilla sugar
  10. 3 eggs (lightly whipped)
  11. 1 ½ cups mashed bananas
  12. 2 cups toasted pecans or walnuts (chopped and divided)
  13. 1 can crushed, undrained pineapple (about 1 oz can)
  14. 1 cup butter, softened
  15. 2 tsp vanilla extract
  16. 1 tsp salt
  17. 2 packages of cream cheese (8 oz each package), chopped in chunks
Directions:
 
To Make Cake
 
  1. Preheat oven to 350 F and grease/flour three 9” cake pans.
  2. Mix dry ingredients first in a large bowl: flour, 2 cups sugar, salt, baking powder, baking soda, cinnamon, and allspice.
  3. Add wet ingredients to dry ingredients and mix well: vegetable oil, vanilla extract, and eggs. Add banana, 1 cup of pecans or walnuts, and pineapple until combined.
  4. Divide batter between the 3 pans and bake for about 25 minutes. Let cakes cool before removing to wire racks.
To Make Frosting
 
  1. Beat butter and powdered sugar together using an electric mixer. Add the vanilla extract and then start to combine the cream cheese, 1 chunk at a time.
  2. Spread the frosting evenly between all the layers, as well as the top and sides of the cake. Sprinkle chopped and toasted pecans/walnuts all over cake.


Lemon Blueberry Layer Cake with Lemon Buttercream Frosting

lemon blueberry buttercream cake lemon icing frosting layer summer recipe better baking bible blog

Lemon Blueberry Butter Cake / Stephanie / CC BY-NC-ND

A refreshing lemon and berry cake is all you need this summer to enjoy the long, gorgeous, sunny days to come! Stacked between layers of blueberry filling and frosted with a delicious lemon buttercream, this cake is a definite winner at any gathering, party, baby shower, or brunch! The recipe below specifically makes the second cake from the top. Enjoy!

Refreshing Lemon Blueberry Layer Cake with Lemon Buttercream Frosting

Layers of delicious blueberry cake, blueberry filling, and lemon buttercream frosting.

Ingredients:
 

For the Cake

– 2 cups plus 6 tbsp all-purpose flour

– 2 tsp baking powder

– 1 tsp salt

– 3 cups blueberries

– 1/2 cup sour cream

– 1/2 cup milk

– 2 tsp vanilla extract

– 3/4 tsp pure lemon extract

– 1 tsp lemon zest

– 1 cup unsalted butter, softened at room temp

– 1 1/2 cups sugar

– 4 large eggs

For the Blueberry Filling

– 1/2 cup blueberry jam


For the Lemon Buttercream Frosting

– 1 cup butter, room temp

– 4-6 cups confectioner’s sugar

– 1/4 cup milk

– 1 tsp lemon extract

Directions:

To Make Cake
 
  1. Preheat oven to 350 F and grease 2, 10″ round cake pans.
  2. In a bowl, sift flour, baking powder, and salt. Place 1 tbsp of the flour into an empty bowl and toss in the blueberries, coating them with flour.
  3. In another bowl combine milk, sour cream, vanilla extract, lemon extract and lemon zest, set aside.
  4. Using an electric mixture, cream together butter and sugar in a mixing bowl until pale yellow and very fluffy. Slowly beat in eggs until combined.
  5. Alternately mix together flour and milk mixture and stir until combined and then fold in blueberries gently.
  6. Divide batter among the 2 pans and bake for 25 mins or until toothpick comes out clean. Remove from oven, cool for 10 mins on rack and then invert onto cooling rack.
  7. Spread blueberry jam on completely cooled cake layers and stack the layers.
To Make Lemon Buttercream
 
  1. In a bowl using an electric mixer, beat butter until pale and fluffy.
  2.  Slowly add in confectioner’s sugar, milk and lemon extract. Add more confectioner’s sugar if necessary.
  3. Frost the top and sides of the cake equally and decorate as you wish!
Notes
 

This recipe is for two cake layers – if you would like to have three layers like in the photo, split all the cake ingredients in half and bake another cake layer.

The Most Delicious Red Velvet Cake

red velvet cake recipe cream cheese white chocolate frosting shaved ideas valentines day most delicious easy better baking bible blog

Red Velvet Cake / Theresaunfried / CC BY, RED VELVET CAKE / STEVEN LABINSKI / CC BY

Soft, moist, and delicious, this red velvet cake is TO DIE FOR! For Valentine’s Day, birthday parties, holidays, and get togethers, this gorgeous red beauty is the perfect choice of cake for any occasion!  Filled with a sweet chocolate ganache and cream cheese frosting, you really can’t get any better than this. Red velvet is a huge hit down in the south, with it being one of the most favorite cakes to date. I was never a huge fan of it myself, until I made it at home – store bought red velvet cakes can’t compare!

* The original photo of this cake that goes along with the recipe used milk chocolate ganache. This one in the photo above uses white chocolate ganache. So whichever you prefer you can use for your recipe.

The Most Delicious, Moist, Red Velvet Cake

Moist red velvet cake filled with chocolate ganache and topped with a cool, cream cheese frosting.
 
Ingredients:


Red Velvet Cake:

– 2 cups plain flour

– 1 tsp baking powder

– 1 tsp baking soda

– 1 tsp salt

– 2 tbsp unsweetened cocoa powder

– 2 cups sugar

– 1 cup vegetable oil

– 2 eggs

– 1 cup buttermilk

– 2 tsp vanilla extract

– 1-2 oz. red food colouring

– 1 tsp white vinegar

– 1/2 cup prepared plain hot coffee


Chocolate Ganache:

– 1/2 cup double cream

– 50 grams chocolate chips or chopped chocolate


Cream Cheese Frosting

– 300 ml. whipping cream

– 1 1/2 cup cream cheese

– 1 cup confectioners sugar

Directions:
 
Red Velvet Cake:
 
  1. Preheat oven to 325F. Grease two 9″ cake pans and line with parchment paper.
  2. In a bowl, whisk together flour, baking powder, baking soda, cocoa powder and salt.
  3. In a separate bowl, combine sugar and vegetable oil. Mix in eggs, buttermilk, vanilla and food colouring until well combined. Stir in coffee and vinegar.
  4. In a separate mixing bowl, put 1/4 of the dry ingredients and gradually add wet ingredients, altering with the dry and wet ingredients until combined.
  5. Equally divide the batter between two prepared pans. Bake for about 30-40 mins or until toothpick comes out clean.
  6. Remove cake from oven, and transfer to cooling rack still in the pan. Allow 10 mins to cool and run a knife around the edges to loosen the cake. Peel off parchement paper and let it cool completely.
Chocolate Ganache
 
  1. In a medium sauce pan, heat the double cream just before it comes to a boil. Remove from heat, add chocolate and stir until smooth.
  2. Place ganache in fridge to cool and thicken or just until it becomes spreadable.
  3. Flip cake layers upside down and spread half of the ganache on each layer. Place in fridge to set.
Cream Cheese Frosting
 
  1. Whip the whipping cream until thick and add in cream cheese and confectioners sugar. Whisk unti combined.
  2. Place one cake layer on a plate and frost with 1/2 cup of frosting. Place second layer on top and frost with another 1/2 cup. Use the rest of frosting to frost the whole cake.
  3. To decorate, sprinkle shaved white chocolate over the top.

Strawberry Sprinkle Funfetti Pancakes

strawberry funfetti sprinkle pancakes recipe easy better baking bible blog birthday party breakfast ideasSTRAWBERRY PANCAKES / KAE71463 / CC BY

Why have plain pancakes for breakfast when you could have this funfetti pancake explosion? Strawberry sprinkles pancakes are something your kids will LOVE to look forward to in the morning – so whip up a quick batch before heading off to sleep and drop them in the pan the next morning. We will be honest with you – there is no easier way to get them up for school in the morning! 

Strawberry Sprinkle Funfetti Pancakes

 
Yields 6
Add some color to your day with these funfetti strawberry pancakes!
 
Ingredients:
 
  • 1 cup all purpose flour
  • 2 tbsp granulated sugar
  • 1 ½ tsp baking powder
  • ¼ tsp kosher salt
  • 1 cup of whole milk
  • 1 egg
  • ½ tsp vanilla extract
  • 2 tbsp butter, melted
  • 5-6 medium-sized strawberries, sliced
  • sprinkles of your choice
Instructions:
 
  • In a small bowl, mix together milk, egg, and vanilla extract. In a separate bowl, mix together flour, sugar, baking powder, and salt.
  • Make a well in the flour mixture and pour in the milk mixture, mixing well and then adding in the melted butter and stirring until combined.
  • Heat a sauté pan over medium-low heat and butter or spray it with cooking spray. Once hot, scoop ½ cup of batter into the pan. Immediately lay 3-4 strawberry slices on each pancake, gently pressing each one in. Sprinkle with sprinkles and let it cook for about 2 mins or until golden brown, flip to the other side and cook for another 1-2 mins.
  • To serve, place strawberry side up and sprinkle with confectioners sugar, or whipping cream and more sprinkles if desired.

Tim Horton’s Boston Cream Donut Replica Recipe

2 Boston Cream donut tim hortons replica recipe better baking bible blog vanilla filling

Boston Cream donut tim hortons replica recipe better baking bible blog vanilla filling frying

A replica recipe to the world famous Boston cream donuts from Tim Hortons! For once you can enjoy your own homemade donuts made from scratch!

Second Photo: Simple and Home Made Blogspot

Tim Horton’s Boston Cream Donut Replica Recipe

 
Yields 14
Classic Tim Hortons Boston cream donuts filled with vanilla cream and glazed with chocolate!
 
Ingredients:
 
Vanilla Cream Filling
 
  1. 2/3 cup granulated sugar
  2. 2 cups whole milk, divided
  3. 2 teaspoons vanilla extract
  4. 1/4 cup cornstarch
  5. 5 egg yolks
  6. 3 tablespoons unsalted butter, softened
Doughnuts
 
  1. 3/4 cup warm milk (105-110 degrees F)
  2. 21/4 teaspoons active dry yeast
  3. 1/3 cup granulated sugar
  4. 23/4 cups unbleached all-purpose flour
  5. 1/4 teaspoon ground cardamom
  6. 1/4 teaspoon nutmeg
  7. 1 teaspoon salt
  8. 4 egg yolks
  9. 1/2 cup unsalted softened butter cut into tablespoons
Chocolate Glaze
 
  1. 4 ounces bittersweet chopped chocolate
  2. 3 tablespoons water
  3. 2 tablespoons light corn syrup
  4. 1/3 cup granulated sugar
  5. 3 tablespoons unsalted butter, softened
  6. vegetable oil for frying
Instructions:
 
  1. In a saucepan, combine sugar, 1 1/2 cups of milk, and vanilla extract and cook over low heat, stirring constantly with a wooden spoon until the sugar is dissolved. Raise the heat almost boiling.
  2. Place cornstarch in a medium bowl and whisk the remaining 1/2-cup milk until smooth. Add the egg yolks and blend.
  3. Slowly whisk in the hot milk mixture into the yolk mixture. Return the milk-yolk mixture to the saucepan and boil gently for 1 minute over medium heat.
  4. Remove from the heat and whisk in the butter. Pass the mixture through a fine-mesh sieve into a bowl. Cover with plastic wrap, pressing it directly onto the surface, and refrigerate until chilled.
  5. Place the warm milk, yeast, and 1 teaspoon of the sugar in the bowl of an electric mixer. Stir the yeast into the mixture and let stand for 10 minutes, or until foamy.
  6. Add 1 cup of the flour and, using the paddle attachment beat on low speed for 2 minutes to form the sponge. Remove, cover with plastic wrap, and let the sponge stand at room temperature until well risen, about 30 minutes.
  7. In a bowl, whisk together the remaining 1 3/4 cups flour with the cardamom, nutmeg, and salt; set aside.
  8. Return the bowl containing the sponge to the mixer stand. Add the egg yolks and mix until incorporated, then beat in the remaining sugar. Slowly add butter, then the flour-spice mixture and beat on medium speed for 5 minutes. The dough should be soft and should not form a ball.
  9. Scrape the dough into a well-buttered bowl and coat all sides with butter. Cover it with buttered plastic wrap, and let the dough rise in a warm place for 1 hour, or until doubled in volume.
  10. Turn out the dough onto a lightly oiled work surface. Gently press down to flatten it evenly to no less then 1/2 inch thick. Cover loosely with plastic wrap and let it rest for 5 minutes.
  11. Line a baking sheet with parchment or waxed paper. Using a floured 2 1/2-inch biscuit cutter, cut out 14 dough rounds. Transfer them to the lined baking sheet, spacing them at least 1-inch apart to allow for expansion. Let rise for 30 minutes, or until doubled in size.
  12. Pour the oil into a saucepan to a depth of 2 to 3 inches. Heat the oil to 360 degrees F. Line a baking sheet with paper towels.
  13. Fry the doughnuts, 3 or 4 at a time, for about 1 minute, or until golden brown on each side. Transfer the doughnuts to the paper towels to drain, then place on a wire rack to cool. As soon as the doughnuts are cool, use a long, thin, plain pastry tip to poke a hole through the midline to the center of each doughnut. Let cool completely before filling.
  14. Remove the vanilla cream filling from the refrigerator and beat with the electric mixer on medium speed until smooth. Scrape it into a large pastry bag fitted with a medium plain tip. Pipe the filling into the hole in the middle of each doughnut until the doughnut feels full. Wipe off any excess cream.
  15. Place the chopped chocolate in a medium heatproof bowl.
  16. Combine the water, corn syrup, and sugar in a heavy-bottomed, medium saucepan. Place over low heat and cook, stirring until the sugar is dissolved. Bring to a full boil and pour the hot syrup to melt over the chopped chocolate. Whisk in the butter and let it cool until it starts to thicken slightly, stirring occasionally.
  17. Spread a scant tablespoon of chocolate glaze over the top of each doughnut and let it sit for a few hours on a rack.

No Bake Chocolate Salami

Even though it’s not an actual salami, this desert sure looks like one. It’s an super easy recipe that is “no bake” so you can prepare it ahead of time, let it sit, and voila your ready to entertain guests and family with this chocolatey favorite. 

chocolate-salami-cokoladna-salama-recept-oblatne-od-cokolade-christmas-bozic-snack-dessert-ideas-no-bake-easy

*If you would like to share my recipe and photos please provide proper credit and a link back to this original post. Thanks!   

 
No Bake Chocolate Salami
 
A simple and delicious desert to wow your family and guests.
 
Ingredients:
 
  • 7.05 oz (200 g) dark chocolate
  • 3.5 oz (100 g) butter
  • 2 egg yolks
  • 1 tbsp cocoa powder
  • 1 tbsp sugar
  • 2 tbsp dark rum
  • 1.4 oz (40 g) almonds
  • 2.1 oz (60 g) arrow root or baby cookies
  • pinch of salt
  • powdered sugar
Instructions:
 
  • On low heat, melt butter with chocolate. Add egg yolks to the mixture, stir for 1 minute.
  • Add sugar, cocoa powder, salt and rum. In the end, add crushed cookies and crushed (or roughly chopped) almonds. Stir to combine. Let cool slightly.
  • Using parchment paper, roll it and shape a log. Wrap in plastic wrap and let cool in the fridge.
  • When the mixture is cooled, roll it into powdered sugar and cut slices. Serve.